Wednesday, June 24, 2009

TableScape Thurs~The McLean House

Welcome to Tablescape Thursday and thank you Susan (Between Naps on the Porch) for hosting your 44th TT!
In Appomattox, VA., where Robert E. Lee surrendered the Confederate troupes to General Grant, you will find the McLean house. It is a beautiful 3 story home.

The McLeans lived in Manassas, VA. He was a banker and also speculated in sugar. After the war started they moved to Appomattox, VA. History tells us it was because of 'business'. But there is also a legend that during the battle of Bull Run (Manassas), which was also the first battle of the Civil War, a cannon ball went through their Manassa home.


In their lovely home in Appomattox the kitchen was on the first/ground floor. The morning table setting of breakfast for the head cook, housekeeper or even Mrs. McLean would look something like this.


Mr. McLean would have had his afternoon tea set in his study much like this.I believe this is Flow Blue. I was behind a barrier and there was a big ranger woman watching me. I suppose she was afraid I would make off with the china....


On the ground floor, across from the kitchen, is the dinning hall. I bet there were many dances in there as well. I love those empire sideboards.... but this is about table settings. Mrs. McLean (or her servants) set a lovely table. And look at the painted cloth under the table. It is beautiful! Expensive for the day and forerunner to our vinyl tile.


Thank you for stopping by and leaving a comment. To see more Tablescapes or to Participate in Tablescape Thursday, go to Susan's blog Between Naps on the Porch.

VBS Crafts for 5th & 6th Graders

You know, it is always hard to find a cool, challenging VBS Project for 5th & 6th graders and still stay with in budget. What I have found that works best, and it is not original with me as I believe the young lady who was in charge of A&C before me told me she did this. Take the budget you have been given, divide the number of classes/grades you have to supply and that is the limit that you give yourself to spend on each class/grade. And that is what I try to do.

We typically have fewer 5th and 6th graders, so we can spend a few more cents on a project per child. But keeping it age appropriate, fun, etc.... Some of these kids were dragged here kicking and screaming... After all, they are TWEENS!!! Some are in Middle School! The great thing about our church is we do not put a 6th grader in a dept with a 12th grader. Nor are they in the same dept with a kindergartner and 1st grader. The 5th & 6th graders have their own Department, their own minister, their own worship leaders, etc. They do not have to be with the little kids or pushed into a scene where they are not quite ready. And we must have some exciting things going on for them b/c we had record numbers of 5th and 6th graders sign up for VBS this year.

5th graders, we chose Painted Ceiling Tiles.
You can buy these by the 6 pack case at Lowes or Home Depot, cut them down to what ever your budget will allow. Kids of all ages love them. This year we selected a larger size and allowed the 5th graders to paint them.
Tempera Paints work best with ceiling tiles. You will need to add a tad of water to them.


We use the primary colors and colors the Aborigine would have used. Some of the children wanted to change things up a bit, so we had white and black on hand for them to do so.

Of course this being Hoover Bucs, Alabama and Auburn Territory, we always have to keep plenty of orange, black, orange, blue, red, grey and white around. However, I did not see much school spirit painting as I have seen in the past.


A young lady, who is a very talented artist and used to be in charge of the VBS A&C researched Aborigine art. Then she came up with some templates for the youth to use with their ceiling tiles. (Thanks Andrea!) And the children were educated on the Aborigine art and then they put their own ideas to work.


I think these 5th graders did a very good job!


They color washed the tile with a background paint one day and gave some thought to their designs. Maybe even doodled with a pencil.


The 2nd day they painted the designs.


We drilled 1/2 inch holes about 1 and 1/2 inches down from the top of the tile. Ran "springy" clothes line rope through and tied it in the back for hanging.

Ceiling tile craft ran around $1.00 per child. You can cut the cost down by cutting the tiles smaller.

6th Grad Craft! Covered Clipboards!


For this craft, we had a lot of supplies already on hand. Supplies such as scrapbook paper, fabric, duct tape, glue & paint. All we had to buy were the clipboards. And through a google search I found them for .77 cents a piece!!! Yes!!!

Since this was to be a pricey craft, we wanted it to be a "right of passage" for the oldest children. Most of them really enjoyed it. And did a fantastic job with their clipboards.
Here are 2 cloth covered ones. They were started on day one. Time was an issue here as we only had 2 days with the tracks being 25 minutes long.


Here are some others that also have fabric on them.

The boys used old blue jeans,, duct tape, really cool designs, but most of them had their names front and center and I did not feel good about putting those photos on my blog....

Here is a completed clipboard. It was done with scrapbooking paper.

Here this clipboard is completed and drying. It has the weeks memory verses included in the decoupage. We try to reinforce the Bible Study Lesson and Memory Verses in all of our crafts.

Day 1 complete the back. Day 2 complete the front.

Because we had so many of the supplies on hand, fabric donated, this craft ended up costing about .80 cents per child. Not one you could do with a large group or a small budget, but doable if you work your plan right.

We had contemplated not doing the Ceiling tiles with the 5th graders next year, but cutting them smaller and, again incorporating VBS/SummerQuest theme, using it for a younger grade. However, I have a 4th grader going into 5th. And DH and I teach 4th graders. They are all 'abuzz' about getting to do ceiling tile painting next year....

Please let me know if you found these posts on VBS Crafts helpful.

I think the ceiling tiles were a hit! And we can give Glory to God!

Friday, June 19, 2009

Mosaic Crosses~VBS Craft

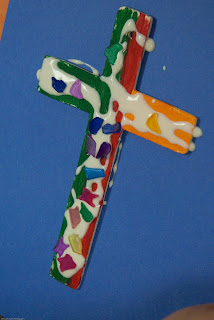
Our 4th grade craft was an Australian Mosaic Cross. My heart was set on Didgeridoos, but my sources for bamboo kept falling through. And what happened to all that bamboo at the $$$ Tree? Last year they had them by the cases. I never could find them this year. They never did get it at the Old Time Pottery Barn either.

One of the ladies who helped me with the selection of the crafts found the wooden crosses and plastic mosaics online.

$5.99 for 12 at S&S Worldwide.


The mosaics were also $5.99 a bag and there were about 1500 pieces per bag. We had tons left over. Some children did not use as many as we thought they would or completely cover the wood with the mosics.


Day one, the crosses were sanded and painted. This took ALL of the time allowed for the track.


Some children were creative with their painting. :D


On day 2 they apply a generous amount of glue and the mosaics.


While the glue is still wet, have an adult instructor apply the mystery part of the craft (sand). We are not allowed to have sand in the church. So.... this had to be closely guarded and secretive.

If you will notice in one of the above photos, the cross has a hole in the top. This is so you can hang it if you like. If the child wants to hang it in a window or as an ornament, they can paint the back. This is a good time to flip the cross over and paint the back. The sand should keep it from sticking to anything. We used fishing line to hang the crosses with.

Another option we gave the children is to use a 1 1/2 inch magnet on the back. If they choose this, have them place a mosaic over the hole so it will not be visible from the front.


The cost on this craft was about .65 cents per child. And another craft that will be a nice keepsake. We will do this cross craft again. And suitable for different age groups.

Down Under Puppet Craft

Kocoa the Koala

Several years ago, Pack-o-Fun magazine had a little teddy bear puppet named Traveling Jack. I have been wanting to use him in SummerQuest for a long time. He was on a track a few years ago, but materials did not work out. So he did not get made.


Using the Traveling Jack pattern as a guide, I modified it into a Koala bear to go along with our SummerQuest (VBS) theme. Really turned out cute. The craft takes about 40 minutes to complete using sewing glue and taking the time to write out a testimony or a witnessing story.


We selected this craft for the 3rd graders. Right at the top of the age for making puppets. However, the idea behind this craft was more than a craft to take home, but a tool for a child to share their testimony and to witness to others.


Some of the children wanted to sew their Koala bears.

Even the boys!!!

OK if you need a week long craft. In our case, each grade only came in for 25 minutes 2 days during the week. Some did sew theirs. I think a lot of teachers helped. You can also use sharpies to add color and facial features.


Make the top on day one and glue the bottom on the second day. The sewing glue is often thick. We have to pour it out on a plate and spread it with a flat toothpick. If it is too thick or lumpy, add a tad of water. But it holds when dry.


Some of the children even added clothing and baby pouches to their Koalas. The loved writing out their testimonies and those who did not know the Lord as Savior, shared that as well. Opened up the door for witnessing and praying for that child.

This is an afforadable craft. If you purchase your felt by the yard and use a coupon (Hancock's, Hobby Lobby, Joann's...) you can get the cost to around 60 cents or so a child. 1 and 1/3 yard of felt will give you about 18 puppets.


For 2nd and 3rd graders, puppets are a great craft. A new pattern can be drafted every year to go with what ever VBS theme you have. Sharpies, colored felt pieces, even sewing can be used in the construction. It just depends on how much time you have.


Some of you have yet to have your VBS. If you are using Lifeway's Boomerang Express Theme and are interested in the instructions and pattern, email me through my profile and I will be glad to email it to you.

Thursday, June 18, 2009

Crafts for VBS~OutBack Adventure!

For us, VBS (we call it SummerQuest) has come and gone. Ours was the first week in June. It was a great week for us! Our theme was chosen from Lifeway's Boomerang Express.

For the past 3 years (I think) I have been craft director. A 'mega church' does not always mean 'mega budget' and we do have a few $$ to spend and we like to look for items that the children will enjoy making and not be trashed as soon as they walk out the door. SummerQuest is also for 1st - 6th grade. And additional challenge to find the right craft for the older children/tweens. And we had plenty of them this year!

Kits from the Craft houses are great, but expensive. Some children can complete them in 5 minutes and you still have to entertain them for 15 + minutes. If we find a craft that works, we will use it 2-3 years in a row. Some crafts we alternate. Some we try to work with the theme.

Lifeway had a great idea with the Praise Bells. We did use that one for both the 1st & 2nd graders this year.
Aborigine Praise Bells

We chose one craft per grade and a filler if needed.
To make this craft last 2 - 25 minutes tracks
we had them paint the outside of the pots the first day.


The next time their grade came to the craft track, we had them add the ribbon and bells.


We used primary colors. The Aborgine Praise Bells turned out very nice.
I think few found their way to the trash.
Also a little tip, we tried to make sure everyone wrote their name & Bible Study Room # on the INSIDE of the pot just in case the mom wanted to display or keep it for a keepsake.

This turned out to be a very nice inexpensive craft. Hobby Lobby had the pots on sale for 1/2 and I ordered 500 of them to cover 2 grades and VBS for a mission action project that our church does in North Birmingham. We had plenty of money left to spend on ribbon including enough to cover the N.B'ham project. We used twine for the jingle bells. If we were to do something similar again, we would use a yarn or a softer string.

Tomorrow I will post about our Kocoa the Koala Bear Witnessing Puppet the 3rd graders made.

~~~Banner~~~

Edited to say I just redid my blog for the 4th! I like it!

I just realized I still have my Easter banner up. I think I need to work on a new one in the next few days.....

Tuesday, June 16, 2009

Outdoor Wednesday-Daylilies

Good Morning! I hope that everyone is having a great day today. Welcome to Outdoor Wednesday hosted by our sweet Susan from A Southern Daydreamer. I took these photos of daylilies a little over a week ago while vacationing in Williamsburg, VA. They are planted in the garden right behind Raleigh's Tavern Bakery. I love to go there to eat a Ginger Cake and drink some Apple Cider. Yum! What a treat!

The sun is hot, but the beauty of Photoshop is, you can adjust that. :D


As you look at the photos, observe all the different prospectives the daylilies were photographed.


Look Around to see what other elements you can include...


Don't forget the other side of the garden. You can get a different prospective of light.

Y'all know, I love those close ups and micros...


I hope you enjoyed the photos! Thank you for stopping by and taking the time to post a comment.

Thank you Susan for hosting Outdoor Wednesday. To participate in Outdoor Wednesday or to see more Outdoor Wednesday posts, please stop by Susan's blog~ A Southern Daydreamer.


Hugs & God Bless,
Missy